
Delta NT
Delta NT
Delta NT
Delta NT
Record detailed vehicle studies in
heavy traffic, simple axle volumes, or anything in between
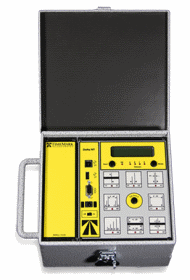
This is our most versatile data collector. Four sensor inputs support all of our road tube layouts. That includes a four-tube configuration that can separate and classify vehicles in adjacent lanes at high volume locations. And it’s all inside a durable sheet metal case that won’t weigh you down.
Get Started with Confidence
Record detailed vehicle studies in
heavy traffic, simple axle volumes, or anything in between
This is our most versatile data collector. Four sensor inputs support all of our road tube layouts. That includes a four-tube configuration that can separate and classify vehicles in adjacent lanes at high volume locations. And it’s all inside a durable sheet metal case that won’t weigh you down.
Get Started with Confidence
When you turn the counter on, the LCD screen displays the battery voltage and the date and time on the counter clock. If everything looks right, just press the Start button twice to start recording. A message on the screen will confirm it has started. The counter can also be configured to remind you to attach your GPS device if the site coordinates have not been entered yet.
When you turn the counter on, the LCD screen displays the battery voltage and the date and time on the counter clock. If everything looks right, just press the Start button twice to start recording. A message on the screen will confirm it has started. The counter can also be configured to remind you to attach your GPS device if the site coordinates have not been entered yet.
When you turn the counter on, the LCD screen displays the battery voltage and the date and time on the counter clock. If everything looks right, just press the Start button twice to start recording. A message on the screen will confirm it has started. The counter can also be configured to remind you to attach your GPS device if the site coordinates have not been entered yet.
When you turn the counter on, the LCD screen displays the battery voltage and the date and time on the counter clock. If everything looks right, just press the Start button twice to start recording. A message on the screen will confirm it has started. The counter can also be configured to remind you to attach your GPS device if the site coordinates have not been entered yet.
Save the Layout on the Spot
Save the Layout on the Spot
Save the Layout on the Spot
Save the Layout on the Spot
It isn’t necessary to program the Delta NT before a study. Details about the site and how the data was recorded can be entered from your field notes later using the VIASsoftware. But it is also very easy to tell the counter how the tubes have been laid out so that can be saved with the file. Before starting the counter, switch to LED mode and use the Select button to choose the diagram that matches your tube layout. Sensor spacing measurements must still be entered later.
It isn’t necessary to program the Delta NT before a study. Details about the site and how the data was recorded can be entered from your field notes later using the VIASsoftware. But it is also very easy to tell the counter how the tubes have been laid out so that can be saved with the file. Before starting the counter, switch to LED mode and use the Select button to choose the diagram that matches your tube layout. Sensor spacing measurements must still be entered later.
It isn’t necessary to program the Delta NT before a study. Details about the site and how the data was recorded can be entered from your field notes later using the VIASsoftware. But it is also very easy to tell the counter how the tubes have been laid out so that can be saved with the file. Before starting the counter, switch to LED mode and use the Select button to choose the diagram that matches your tube layout. Sensor spacing measurements must still be entered later.
It isn’t necessary to program the Delta NT before a study. Details about the site and how the data was recorded can be entered from your field notes later using the VIASsoftware. But it is also very easy to tell the counter how the tubes have been laid out so that can be saved with the file. Before starting the counter, switch to LED mode and use the Select button to choose the diagram that matches your tube layout. Sensor spacing measurements must still be entered later.
Easily Monitor Study Progress
Easily Monitor Study Progress
Easily Monitor Study Progress
Easily Monitor Study Progress
During a long study, it’s a good idea to visit the site periodically to make sure everything is still in place and working. LED lights let you quickly see whether every sensor is still recording hits. The LCD screen shows even more information. You can check the battery voltage or see how many strikes have been recorded by each sensor. Strike totals for the first 24 hours only and the entire study are displayed.
During a long study, it’s a good idea to visit the site periodically to make sure everything is still in place and working. LED lights let you quickly see whether every sensor is still recording hits. The LCD screen shows even more information. You can check the battery voltage or see how many strikes have been recorded by each sensor. Strike totals for the first 24 hours only and the entire study are displayed.
During a long study, it’s a good idea to visit the site periodically to make sure everything is still in place and working. LED lights let you quickly see whether every sensor is still recording hits. The LCD screen shows even more information. You can check the battery voltage or see how many strikes have been recorded by each sensor. Strike totals for the first 24 hours only and the entire study are displayed.
During a long study, it’s a good idea to visit the site periodically to make sure everything is still in place and working. LED lights let you quickly see whether every sensor is still recording hits. The LCD screen shows even more information. You can check the battery voltage or see how many strikes have been recorded by each sensor. Strike totals for the first 24 hours only and the entire study are displayed.
Incorporated

Layout 11
Number of channels:
1 (all lanes will be combined)
Sensor used:
A (closest to the lid hinge)
Typical studies:
Axle Volume, One-Sensor Speed, Axle Gap – Binned, Axle Gap Count
Notes:
The tube may cross more than one lane. However, all but one strike will be
blocked whenever more than one vehicle crosses the tube at the same time (“shadowing”).
This is only a problem for volume counts in heavy traffic or near controlled intersections.

Number of channels:
2
Sensor used:
A and B
Typical studies:
Axle Volume, One-Sensor Speed, Axle Gap – Binned, Axle Gap Count
Notes:
Each tube may cross more than one lane. However, a strike in an outer lane
will be blocked whenever a vehicle crosses the same tube in the inside lane at the
same time (“shadowing”). This is only a problem for volume counts
in heavy traffic or near controlled intersections.
Layout 21

Number of channels:
2
Sensor used:
A for the short tube (lane(s) nearest the counter only)
B across all lanes
Typical studies:
Axle Volume
Notes:
The far lane volume is calculated by subtracting the number of A strikes from the B strikes.
If the B tube is used for a one-sensor speed or an axle gap study, the results will be for all lanes combined.
Layout 31

Number of channels:
2
Sensor used:
A and B
Spacing between tubes:
4 – 6 inches (10 – 15 cm)
Typical studies:
Axle Volume
Notes:
This layout is only for low-speed traffic, such as in a residential neighborhood.
It also works best when there will rarely be two vehicles crossing the layout at the same time.
If a single tube is used for speed or axle gap, the results will be for both directions combined.
Layout 41

Number of directions:
1 (Layout 52) or 2 (Layout 51)
Sensor used:
A and B. When used for one-way traffic (Layout 52), vehicles must cross the
A tube first.
Spacing between tubes:
10 – 16 feet (3 – 5 meters). When speeds will be over 40 mph (65 k/h), 16 ft. (5 m) is recommended. Be sure to note the exact spacing used so the data can be analyzed correctly.
Typical studies:
Vehicle Volume, Classification, Vehicle Speed
Notes:
For sites with more than one lane going in the same direction, this layout will work best where only one vehicle usually crosses the tubes at a time. If there may be high peak hour volumes, consider Layout 67 or 68 instead.
Vehicle study results are per direction, not per lane.
Any axle studies will combine all lanes and directions.
Layout 51-52

Number of channels:
4
Sensor used:
A, B, C, and/or D
Typical studies:
Axle Volume, Sensor Testing
Notes:
Each tube is treated separately. The exact layout is not important (as long
as the tubes are parallel to the vehicle axles).
Layout 61

Number of channels:
4
Sensor used:
A and B on one side of the median, C and D on the other
A and C must be the short tubes (only crossing the lane nearest the counter)
B and D lie across all lanes on their side of the median
Typical studies:
Axle Volume
Notes:
Far lane volume is calculated by subtracting the number of strikes on the shorter tube from the number on the longer tube.
If a long (B or D) tube is used for one-sensor speed or axle gap, the results will be for all lanes on that side of the median.
Layout 63

Number of channels:
4
Sensor used:
A and B on one side of the median, C and D on the other.
Vehicles must cross the A or C tube first.
Spacing between tubes:
10 – 16 feet (3 – 5 meters) for each pair. When traffic will be faster than 40 mph (65 k/h), 16 ft. (5 m) is recommended. Measure and record the exact spacing so the data can be analyzed correctly.
Typical studies:
Vehicle Volume, Classification, Vehicle Speed
Notes:
There may be more than one lane on each side of the median. However, this layout works best when there is usually only one vehicle crossing a pair of tubes at a time (one vehicle on each side of the median at the same time is okay). Vehicle study results are per channel, not per lane. Any axle studies will combine all the lanes the selected sensor crosses.
Layout 65

Number of channels:
4
Sensor used:
A, B, C, and D
The tubes must be connected in order so that A crosses the fewest lanes and D crosses
the most.
Typical studies:
Axle Volume
Notes:
This layout can be used with three lanes by leaving off the A or D tube. For two lanes, see Layout 31.
A single-sensor axle speed or gap study will combine all the lanes crossed by the selected tube.
Layout 66

Number of channels:
1 (Layout 67) or 2 (Layout 68)
Sensor used:
A, B, C and D
A and C are the shorter tubes, B and D cross all lanes.
The tubes in the near lane must be crossed in order (A, then B, then C, then D).
Spacing between tubes:
10 – 16 feet (3 – 5 meters) between B and D, 9 – 18 inches (20 – 45 cm) between
A and B. The wider spacing is preferred for speeds over 40 mph (65 k/h). The exact spacing must measured and noted for proper analysis.
The distance between A and C should be the same as between B and D.
Typical studies:
Vehicle Volume, Classification, Vehicle Speed
Notes:
This layout is designed for two lanes of high volume traffic (or moderate volumes when the traffic is traveling in the same direction in both lanes). Classified vehicle results will be reported per lane.
If you don’t need separate results for each lane, and traffic volumes are low enough that there will rarely be vehicles in both lanes at the same time, you may be able to use Layout 51 or 52 instead.